

How to 3d Print Your Own Dark Trooper Helmet
Are you a fan of the Star Wars series and have always wanted your own Dark Trooper costume? In this tutorial, I am going to show you how to build your own Dark Trooper Helmet in six steps using a 3D printer. Trust me, it is not complicated at all. The 3D printer and slicer (3D printing software) used in this tutorial are Creality CR10 S4 and Simplify3D respectively. Of course, you can use any 3D printer and slicer available to you. All you have to do is to follow the steps given and you will end up with a beautifully made helmet. Let’s begin.
You can get the .STL file for this helmet here.
You can get the glossy black spray paint here.
You can get the red transparent film here.
This is the 3d printer I use- CR10S4
Step 1: Importing .stl file to your slicer
Import the downloaded .stl file into your slicer.
Step 2: Setting the orientation of your print
You want to orient the helmet as flat as possible to the build plate as shown in the image below.
Orienting the print this way will give you a good angle so you do not need supports for the visor part of the helmet while printing.
You can access the orientation settings by clicking on the icon shown by the arrow below.

Input the “Change Rotation” values shown in the images below. This will give you the flat orientation you desire.
You can choose to scale the helmet to any size you wish.


Step 3: Generating Supports
You only have to add supports to the base outline of the helmet as shown in the image below. You don’t need supports in the hollowed center of the helmet.


To do this, click on the “Customer Support Structure” tool as shown below

A window like this will pop up:

Go on and input the value as seen above.
Now, by clicking on “Generate Automatic Supports”, simplify3D will generate supports to every part of the helmet that it detects needs supports including the hollowed center of the helmet. We don’t want that as we only need supports on the base outline of the helmet as shown earlier.
To achieve this, click on “Add new support structures”. This option will allow you manually place supports wherever you want them on the helmet. Go ahead and place your supports as shown in the images earlier.
Quick Tip: If you noticed, I mentioned that you don’t need supports for some parts the helmet (the hollowed center especially). You might be wondering how you too can know whether or not you need supports for a part of your print, so you can save time and filament material while printing.
Answer: Because 3D printers print layer by layer, you mostly only need supports when the next layer to be printed doesn’t have any layer under it and that layer is not the first layer. Definitely, the 3D printer cannot print in thin air. Another case where supports are needed is when the angle between the layers (overhang angle) exceeds 45 degrees.
If you study the geometry of your print and take those points into consideration, you should be able to tell when you need supports or not. This decision will help you save printing time and filament material.
Step 4: Print Process Setting
You can access the print process settings by clicking on “Edit Process Setting” while your process has been highlighted or double-click the process you want to edit in the lower left corner.

A window like this will pop up:
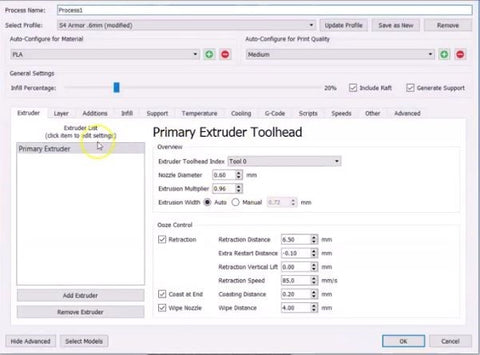
On the General Settings, make sure “Include Raft” and “Generate Support” are both checked.
An infill percentage of 20% is preferred for this print.

Now let’s go onto the various tab settings:
Under the “Extruder” tab

Under the “Layer” tab

Under the “Temperature” tab

Click “OK” when you’re done inputting all necessary settings as shown above.
Step 5: Click on “Prepare to Print!” to start your 3D print.

Step 6: Finishing your helmet
When your helmet is done printing, you want to prime it with any color of your choice. This will give it a very shiny look. You can find the glossy black spray paint used in this tutorial here.

Lastly, you want to work on your visor. You can get the transparent red film used for this helmet here. Measure the film to go from one side of the helmet to the other and the cut it. You should have a rectangular strip about 3.5 x 11 inches. Glue the film on the inside of your helmet.
There you have it! You have successfully 3D printed and finished your own Dark
Leave a comment